Friday, October 28, 2011

Happy Halloween Weekend

The other day I was searching my cupboards digging out my Halloween decorations and decided I wanted to make up a little Halloween display. I had fun playing around with the bits and pieces, not for any real reason, expect maybe that it was a good excuse to buy candy corns.

Happy Hallo-weekend everyone!
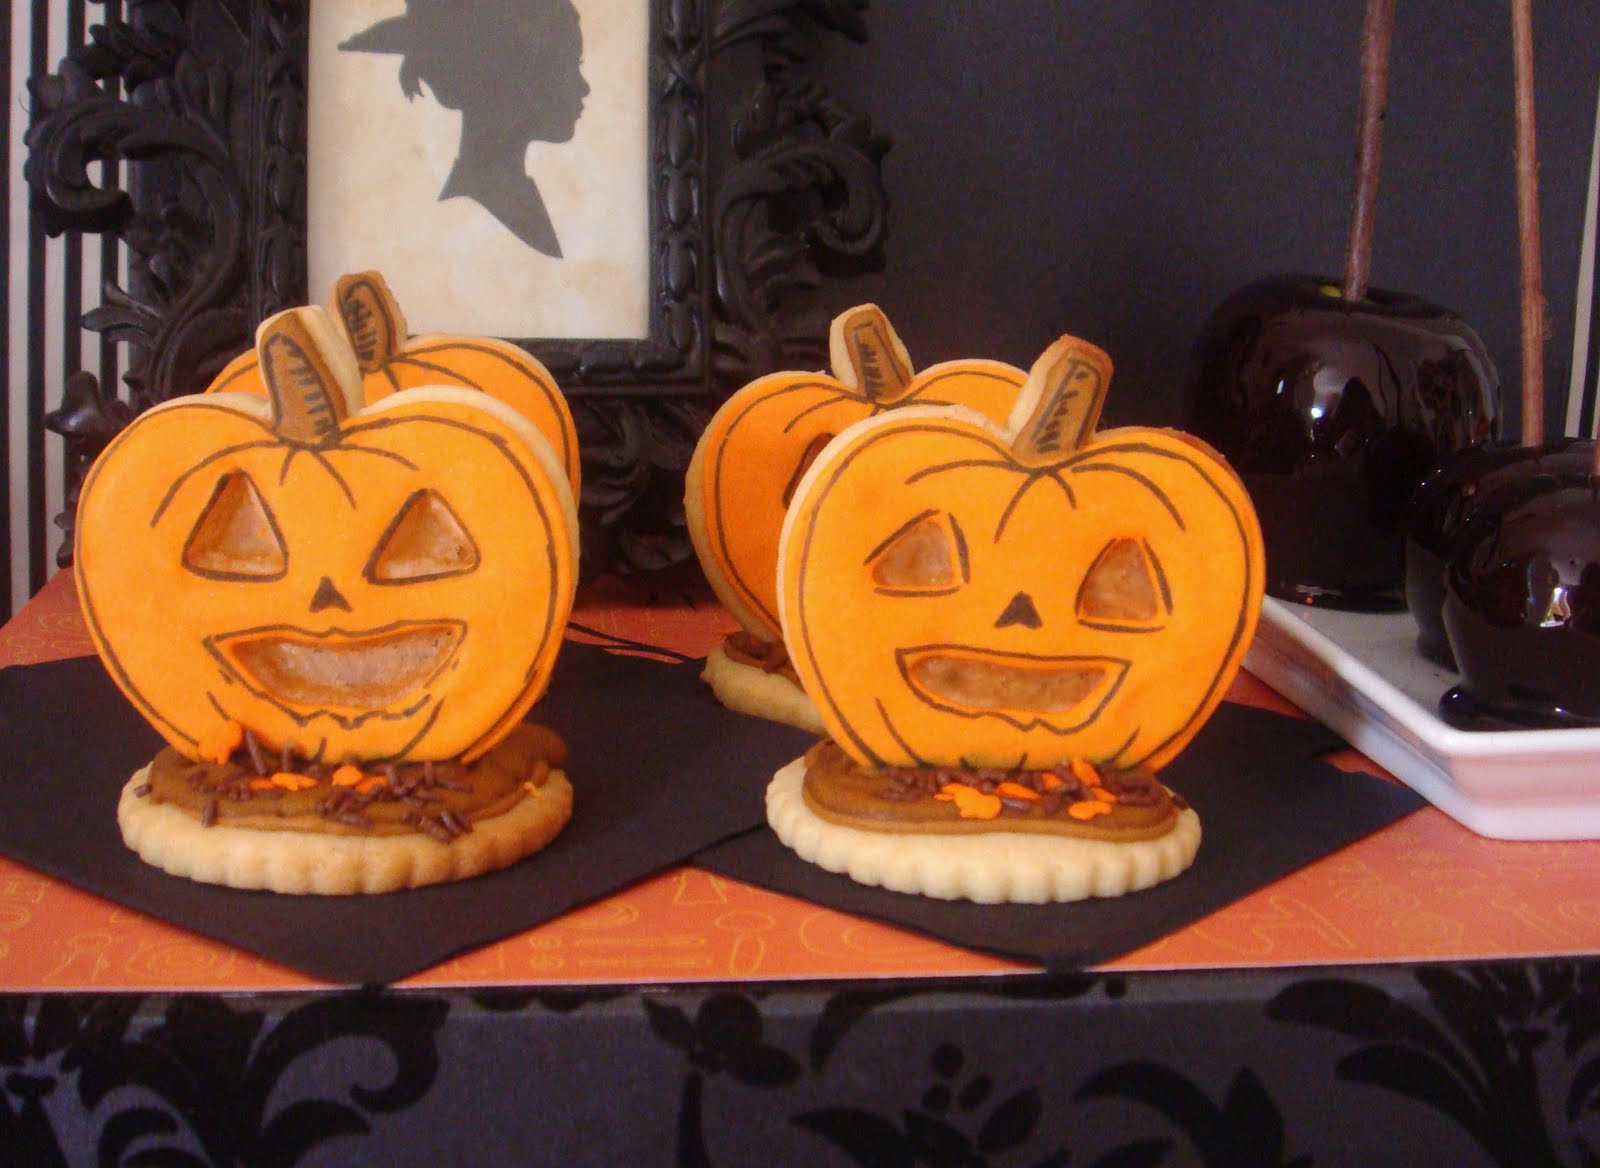
If you haven't had enough Halloween baking I've included a little round-up, click on the links for how to's on each of these spooky sweets. Happy Halloween Baking!

Poison (Candy) Apples
Doughnut Cookies
And one from last year Bride of Frankenstein Cookies
Have a great weekend!

Monday, October 24, 2011

Poison (Candy) Apples

Look what I found, so excited! Those of you who read my Creme Egg Macarons post at Easter know how much I love creme eggs. I've never ever found these in Austalia before, its so awesome to get creme eggs twice a year, plus they look really cool in halloween colours and have pumpkins on them. Oh and they're slime green coloured inside! Head to Big W if you want some.
Now onto the Poison apples. I have been scared of toffee for a long time, a friend and I tried making toffees when I was little, we ended up with burnt toffee all over her kitchen and I've steered clear since. When I was asked to make toffee apples for a display a couple weeks ago I was a little worried, I finally made myself buy a candy thermometer to ease my fears and everything worked perfectly. I have made candy apples three times since, I cant get enough, I'm totally loving the whole crunchy toffee outside crispy apple inside bit.
I'm going to tell you a secret, Poison Apples are just black candy apples. I know toffee apples are pretty common at this time of year, I decided to make them a little different and more Halloweeny by colouring them black and using real sticks instead of popsticks. (My step-by-step pictures are of red candy apples).

  • For the Candy Apples

8 apples (this with vary depending on the apple size)
  • 2 cups white sugar
  • 1/2 cup water
  • 1/4 teaspoon cream of tartar
  • 1 teaspoon black liquid food colouring
A stick for each apple (washed and dried)

To make the Candy Apples- wash and dry the apples, push a stick into the top of each apple. Line two baking trays with non-stick paper.
Place the sugar and water into a heavy-based saucepan, cook over low heat, stirring until the sugar had dissolved. Once the sugar has dissolved increase the heat to high and bring to a boil,
stir in the cream of tartar and the food colouring.

Reduce the heat to low and allow the toffee to simmer for about 20 minutes until it reaches hard crack stage (150 degrees c/ 300 degrees f). To test the toffee, drop a small amount into a glass of cold water, when you take it out it should not be sticky and should crack easily. Once the candy tests right remove it from the heat straight away.
Holding the pan on an angle, dip the apple into the toffee, turn the apple until it is totally coated.
Allow a little of the excess toffee to drip off and place onto the prepared trays. Continue with the rest of the apples. Allow the candy apples to set at room temperature.
They're best eaten the day they are made, Enjoy.

Wednesday, October 19, 2011

Light-up Jack-o-lantern Cookies

I'm so happy I get to a little Halloween baking this year, I missed out while away on holidays last year. I made it up to myself by sampling all the tasty Halloween treats we came across on our travels, I still find myself day-dreaming about pumpkin cupcakes and fall harvest doughnuts. Halloween hasn't been a holiday widely celebrated in Australia, which is sad because its one of my favs. It seems things might be different this year though, the stores are full of creepy decorations and tasty themed treats and sweets.
Its very hard to find an orange pumpkin here at this time of year, unless your happy to pay ridiculous amounts for the ones the shops get in especially for Halloween. Not wanting to fork out $25 for a pumpkin I decided to make my Jack-o-lanterns out of sugar cookies instead. As kids we made stained glass cookies at Christmas, I thought the crushed candy cutouts would suit these pumpkin cookies perfectly. Barley sugars were a great colour for the pumpkin eyes and mouth and melted into a nice thin candy glass when they were baked. These cookies looked great as they were but the candle light behind made them extra awesome.
For the cookies
sugar cookie dough (I used this same recipe for the cookies and icing)
crushed see-through candy
orange and brown royal icing
black edible pen
Halloween themed sprinkles

To make the cookies- first roll out the cookie dough to around a 1/4 inch thick, cut out an even number of pumpkins and bases. I didn't have a pumpkin shaped cutter so instead I used my apple cutter and trimmed off the leaf. For the base cookie I used a fluted circle cuter.
Transfer the cookie cutouts onto a tray lined with baking powder. Using a small sharp knife cut out the pumpkin faces. Chill the cookies in the freezer for a few minutes until they are nice and firm. Preheat your oven while you wait.
Remove the cookies from the freezer. Fill the eye and mouth holes with the crushed candy and bake according to the sugar cookie recipe.
Outline and flood the pumpkins with royal icing. (Looking cute so far)
While the pumpkins are setting pipe a puddle outline on the cookie bases, set aside to dry.
Once the royal icing is completely set draw on the pumpkin details with an edible pen.
Pipe a thick line of icing in the middle of the base cookies to attatch the jack-o-lanterns.
Stand the pumpkin cookies on their bases, I used a cooling rack to keep them in place as they set. Once the icing is completely dry flood the bases with the brown royal icing and add some sprinkles.
To light up the pumpkins I used some thin black birthday candles cut in half. To get the candles to stand up press them into little balls of black fondant. Press the fondant onto the base cookies behind the pumpkins, not to close though or you'll end up with burnt cookies.
Light the candles and admire the glowing pretty pumpkins.

Sunday, October 16, 2011

Red Riding Hood Cake

I was almost jumpimg up and down excited when I recieved an email from Enchanted Empire a few weeks ago, asking if I could make a wedding cake and a few other goodies for a display at the Queensland Bridal Expo. I was very happy to be involved, even more so when I found out the theme, Red Riding Hood. It was lovely meeting Brooke and Shae from Enchanted Empire, after discussing the concept for the display and their ideas for the cake, I couldn't wait to help bring their vision to life. Head over to the Enchanted Empire blog to take a look at their amazing work and read all about the Expo experience.
I also made some macarons to match the theme colours and some shinny red candy apples. I managed to find the cutest miniture apples to use for rustic toffee apples and in the decorations on the cake.
I had so much fun styling this cake, with so many great bits and pieces to work with there was definitely no lack of inspiration. The Enchanted Empire girls had found a whole bunch of goodies to decorate with, I loved the colours of the dried flowers and maple leaves and the cinnamon sticks made my whole kitchen smell yummy.
This was my first time working with flowers, I am no florist (althought I've often thought it would be a fun job) but I had a great time with this and was really pleased with how it turned out. My bench and floor were so covered with twigs and leaves by the time I was done, no matter how much I clean I'm sure bits will keep turning up for a good while.
I really love the Red and Wolf cameos the girls added to the cake, how awesome do they look.
There were times this cake and I were not on friendly terms, particularly when trying to cover the tall layer with fondant, it took a number of attempts but I so happy when I finally got it. By the time I had finished decorating the cake I had fallen in love, I had a tough time giving it up.
Thanks again to Brooke and Shae from Enchanted Empire for letting me be involved and for using their amazing photos.

Wednesday, October 12, 2011

Malteser Cupcakes

After a scary scary trip to the dentist a few weeks ago I spent the next few days eating only custard and drinking malt smoothies. Malt is something I usually only have in the occasional milkshake, so I was excited to have a whole tin with lots left over for some baking . As soon as I was able to eat normally again I put my malt powder to good use in some Maltester themed cupcakes (breaking my oven in the process).
I was pretty happy with how these cupcakes turned out, between the malt powder and the crushed maltesers in the mix they had the prefect level of malty goodness. For the cupcakes themselves I slightly modified my favorite vanilla cupcake recipe and toped them with a two tone swirl of chocolate and malt buttercreams.
For The Cupcakes
1 3/4 cups self raising flour
1/2 cup malt powder
180 grams softened butter
1 teaspoon vanilla extract
1 cup caster sugar
4 eggs
4 tablespoons milk
1/2 cup Maltesers (crushed)

To make the cupcakes- Preheat oven to 180°c, line cupcake trays with papers.

Sift flour and malt into a mixing bowl, add the butter, vanilla, sugar, eggs, and milk.

Beat all the ingredients on low until combined, increase the speed to medium and beat until the mixture is pale (it will be pretty yellow from the malt). Gently fold in the crushed Maltesers.

Divide the mixture between the cupcake pans, filling each two thirds full. Bake for about 20 minutes until the cupcakes spring back when poked.

Leave the cakes in the pan for 5 minutes before placing on a wire rack to cool completely.

Wait untill the cupcakes are completely cool before icing.

For The Buttercream

100g butter (softened)
2 ½ cups icing sugar
2-3 tablespoons milk
1 teaspoon vanilla extract
1/4 cup malt powder
1 tablespoon cocoa powder
Crushed Maltesers

To make the icing- In a bowl beat butter until pale. Gradually beat in the icing sugar and malt and then the vanilla and milk. The buttercream should be light and fluffy. If too thin gradually add a little more icing sugar, if too thick add a little more milk.

Spoon a quarter of the buttercream into a second bowl and mix in the cocoa powder.

Fit a piping bag with a large star shaped tip. Spoon the plain malt icing into one side of the piping bag and fill the remaining half with the chocolate buttercream.

Pipe a swirl of icing onto each of the filled cupcakes. Sprinkle with some crushed Maltesters.

I hope you enjoy these as much as I did.

Sunday, October 9, 2011

Birthday silliness

I'm sorry I'm not showing you anything new today, but don't worry it will be coming soon. I've been doing too much baking and not enough blogging. Instead of a baking post I though I would share a silly story from my weekend.

It was my birthday on Saturday so I figured I'd be able to have a nice sleep in. It was not to be, at 6am a distressed looking boyfriend woke me up with a happy birthday and told me the cat had a bit of a mishap. Both he and the cat were covered in paint.
We had joked before about getting the cat to do a painting after seeing a book about kitties that paint, boyfriend thought it would make a fun birthday present. Boyfriend got some kitty safe paint and set out paper but our little cat had decided she wanted to lay in the paint instead of just making footprints.

It was the funniest birthday morning ever, I have a cute painting, a front step covered in colored pawprints and a cat with spots of red and yellow being as spazzy as always.
New recipes coming soon.